Good work Shaggs , had a similar not situation here, different system , same over all though . I new nothing and learnt lots , now the engine works so much better and i have some more knowledge . It is an amazing feeling to learn something !
Good on you Shaggy! Good on you for admiting it was a s***** job to do, good on you for persevering, and good on you for finding a solution. It inspires us all.![]()
Thanks!
We had a spare few hours this arvo , enough to have a crack at getting it all together ready for re-installation. The ram is as simple as you can get, there are only two hydraulic lines, one to each end of the cylinder. Selecting the up or down button switches the high pressure oil pump output to one or the other, so the piston is always pushed. This is the shaft without the piston assy, the bottom part is what connects the keel. The end cap for the cylinder is top left ready for its new seals. And of course the obligatory trusty tub of vasoline!

Fitting the piston with the new seal , holders and spacers. The shaft is about 4", the piston OD is about 6", it looks small but is surprisingly heavy.

Liberal amount of vasoline on all the seals, and jugs of hot water to soften up all the seals before installation. This is the end cap sitting in a tin of boiling hot water softening up the seals so we could get it back onto the shaft. It took a few hot baths and a shroud using a laminated map before it finally slid on. An oil filter wrench was then used to screw the end plate home onto the cylinder.....

And hoo-bloody-ray, it's together at long last! This next pic is all assembled but resting upside down to show where the hydraulic lines enter the cylinder on either side of the piston. The weird little plate welded to the cylinder is a bash plate to protect the hydraulic line from damage. The end plates go outside the keel box and are through bolted with only the circular collars protruding inside the box.
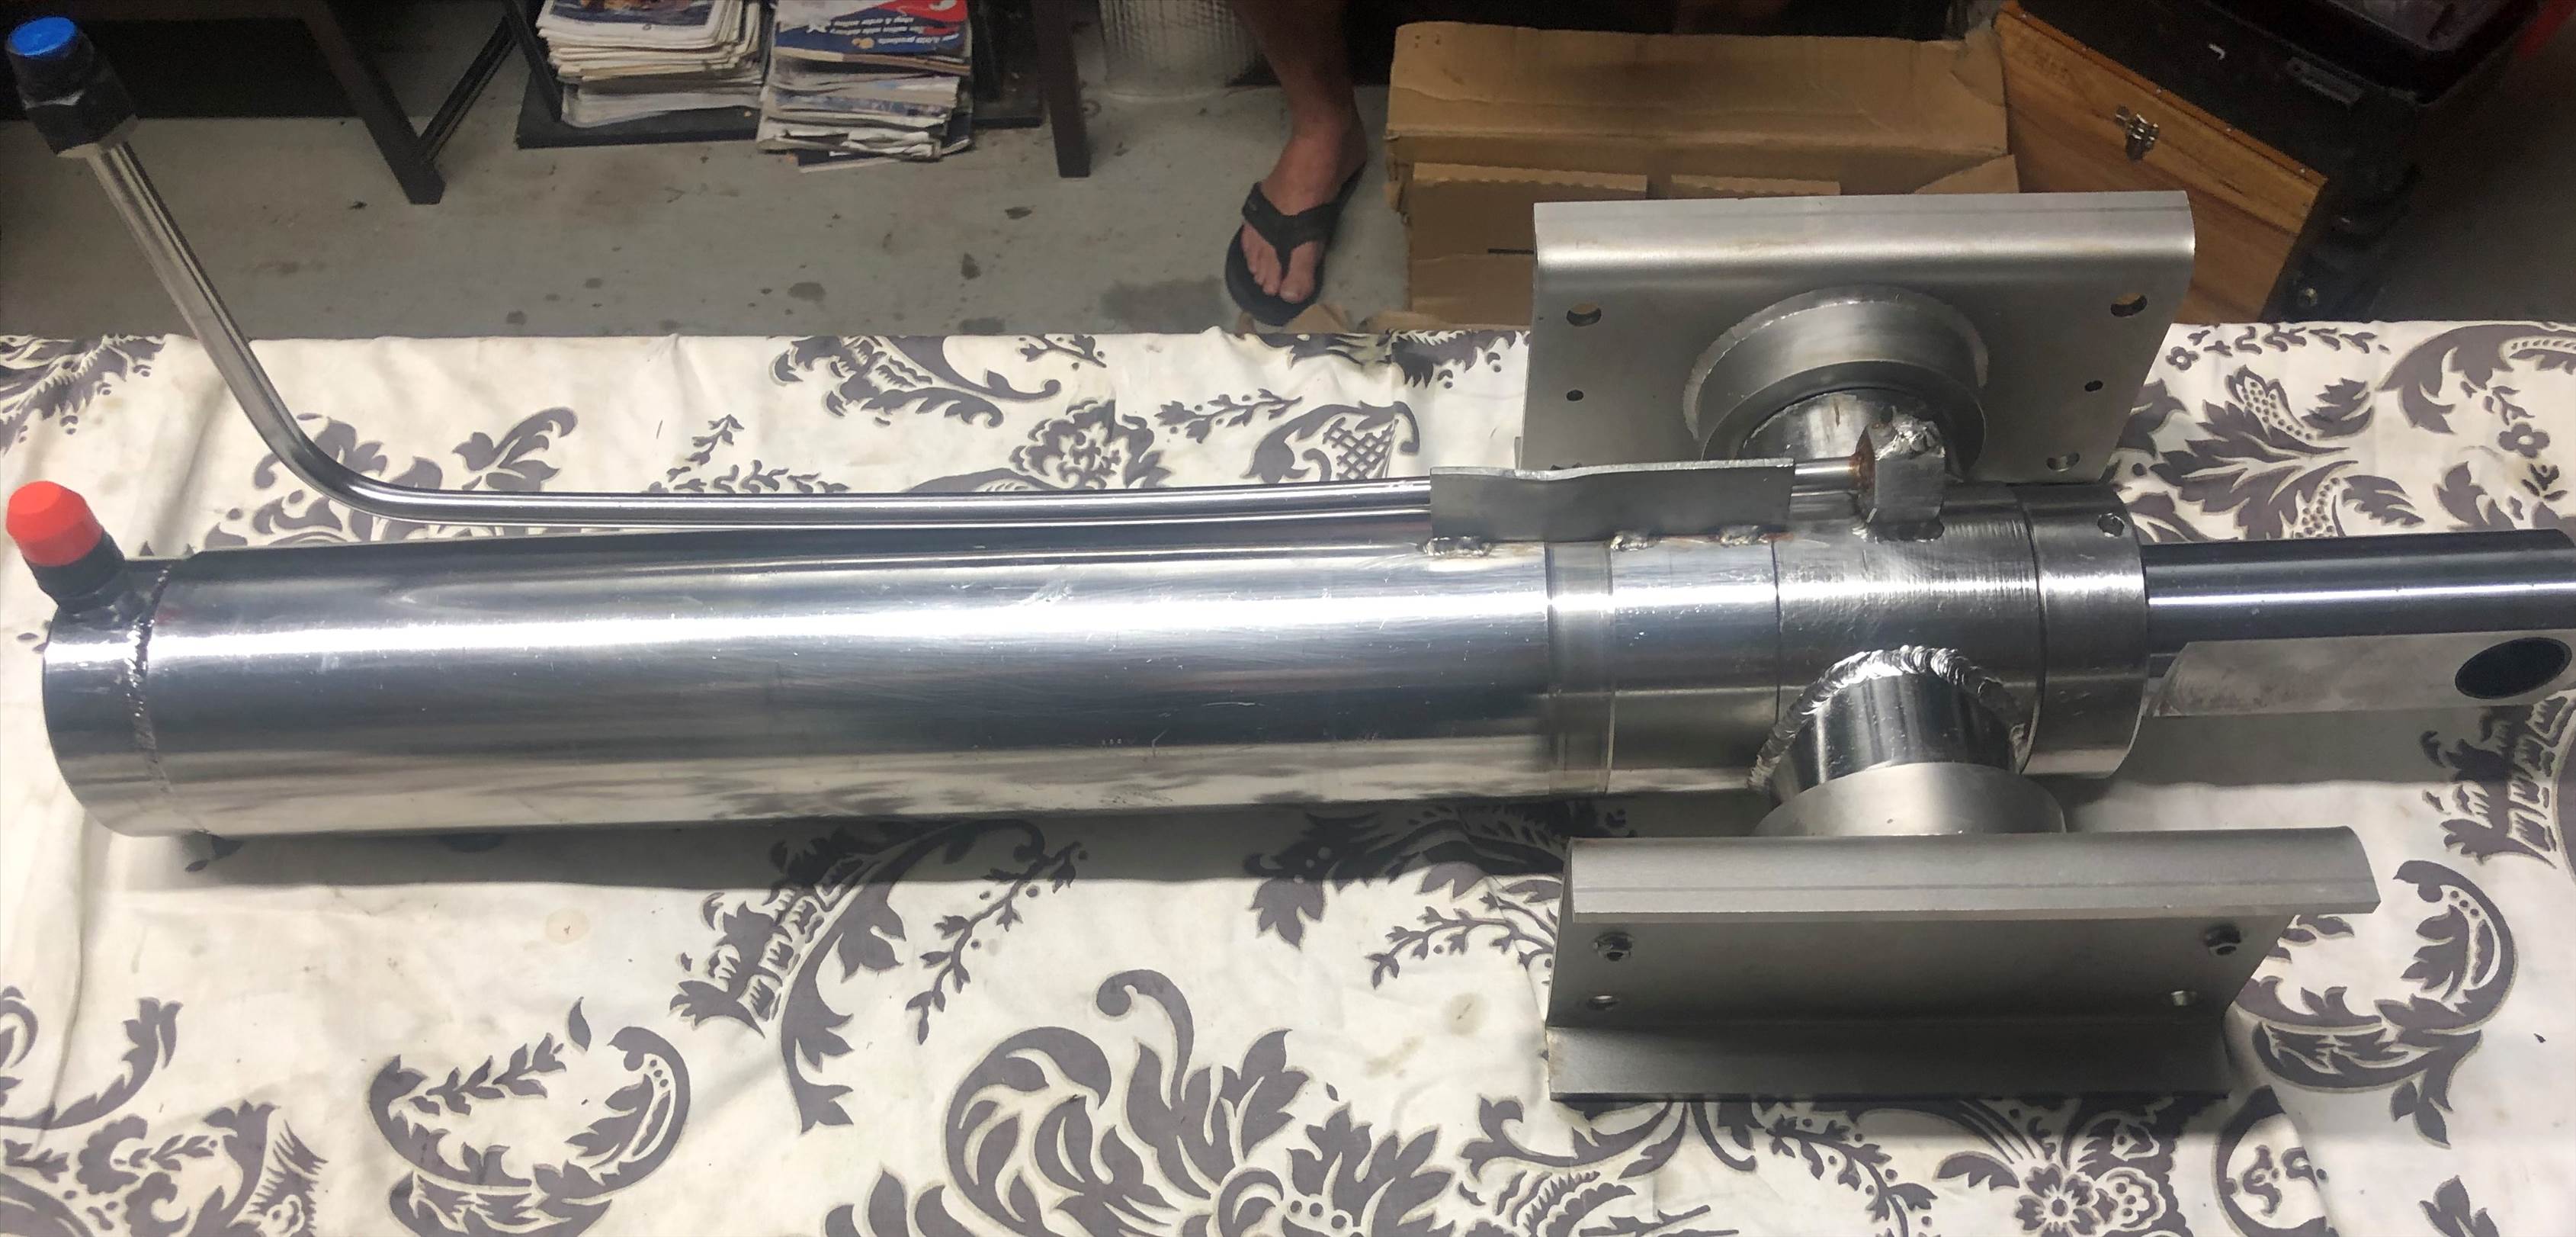
The following pic shows all the bits that get wet, ie: reside inside the keel box. The back of the keel box only has a small opening for the ram to extrude, the grommet and shroud that cover this hole fit just behind the end plates. The shaft end faces the bow, the cylinder faces the stern.
The shaft end is what fits inside the keel head where it's through pinned. End caps in the keel screw over the pin to hold it in place.
A few trial in outs using compressed air down the hydraulic lines and it's smooth as a babys backside.
Job done.
Now I just have to drop it back in, reseal the keel box and re-attach the hydraulic lines, yay!
And most importantly, ring the diver. The bum is going to be so dirty after almost 10-12 weeks since the last clean.

Awsome job,well done. You deserve a beer or two after that. Thanks for posting and thanks to the people that helped out as I learnt about galling and a few other things.
Great stuff Shaggy. Here is hoping you don't have to do it too often.
That is seriously technical job.
Very happy to see that you are not using the wife's favorite towel.
Err,,,, hang on a sec.
Isn't that grandma's favorite curtain!!!
Oh, well. Too late now.
Enjoy the leak free ride.
gary
Removed all the emergency food from the Castle and consolidated it in the shed.
Replaced the trailer winch cable.
All easy cos the beastie sits on a trailer in the front yard.
Select to expand quoteMysticCastle said..
Removed all the emergency food from the Castle and consolidated it in the shed.
Replaced the trailer winch cable.
All easy cos the beastie sits on a trailer in the front yard.
I dream some days of that capability Mystic!
I had a holdup on getting the hydraulic oil, being 22 ISO it's not that easy to find. now have to wait till Tuesday for that to arrive.
That gave me some extra time, so yesterday I pulled the hydraulic pump, tank and solenoids out.
Today will be cleaning everything, check the pump for wear and tear. check all the hydraulic fittings and regrease all the electrical connections.
I had to take a careful note of the position of the two orange knurled wheels as these determine the pressure and are set at the factory. You can adjust it but verrry carefully, no more than a quarter turn at a time. Reading the settings it's set for 2175 psi. To a hydraulics guy that probably nothing I am sure, for me being a numpty it sounds like a lot, so best to check over everything just in case.

Practicing for the impending Coronavirus curfew, first boat maintenance, then boat sailing time!
This was running automatic transmission fluid through the pump, solenoid valves and exit lines to check for any residual gunk, the two lines are run to a nice clean s/steel bucket under the bench . There was some gunk in the tank, but the sump filter had done its job well, nothing in the pump or lines. A bike battery enabled us to test using the electrical pump, and then using the manual hand pump (handle removed) in the foreground.
This fits into the aft section of the cabin table which it shares with the ram cylinder As the keel comes up the back of the ram cylinder rotates downward into this space, so this has to sit offset to starboard. The components are all modular, so you can build your system vertically or horizontally to fit the space required, its kinda neat. Reminds me of Ikea ![]() .
.
Ticking the boxes...

jury rigged a mizzen staysail, need a halyard at the mizzen mast top to get a better shape about it. need to be a bit of an octopus to deal with this lot single handed ! pics are courtesy of a passing fisho


jury rigged a mizzen staysail, need a halyard at the mizzen mast top to get a better shape about it. need to be a bit of an octopus to deal with this lot single handed ! pics are courtesy of a passing fisho
Select to expand quoteshaggybaxter said..
Practicing for the impending Coronavirus curfew, first boat maintenance, then boat sailing time!
This was running automatic transmission fluid through the pump, solenoid valves and exit lines to check for any residual gunk, the two lines are run to a nice clean s/steel bucket under the bench . There was some gunk in the tank, but the sump filter had done its job well, nothing in the pump or lines. A bike battery enabled us to test using the electrical pump, and then using the manual hand pump (handle removed) in the foreground.
This fits into the aft section of the cabin table which it shares with the ram cylinder As the keel comes up the back of the ram cylinder rotates downward into this space, so this has to sit offset to starboard. The components are all modular, so you can build your system vertically or horizontally to fit the space required, its kinda neat. Reminds me of Ikea ![]() .
.
Ticking the boxes...
Well done mate and thanks for the whole story and pics.
Installed 2 off 0.5m versions of these under each sidedeck - 25' yacht. Got them for $15 each a month ago and now I see these 1m long ones are at $9 each. Have to go and get 3 more...........
www.supercheapauto.com.au/p/sca-sca-strip-light---led-12v-1m-rigid-white/386324.html
Has anyone had any issues with these? Thanks.
Select to expand quoter13 said..
Installed 2 off 0.5m versions of these under each sidedeck - 25' yacht. Got them for $15 each a month ago and now I see these 1m long ones are at $9 each. Have to go and get 3 more...........
www.supercheapauto.com.au/p/sca-sca-strip-light---led-12v-1m-rigid-white/386324.html
Has anyone had any issues with these? Thanks.
I use these on my cars and I reckon they would be excellent in yachts as well.
www.ebay.com.au/itm/2pcs-8LED-Car-Daylight-Driving-Light-DRL-Daytime-Running-Bright-Head-Lamp-Light/264361749206?_trkparms=ispr%3D1&hash=item3d8d302ad6:g:814AAOSwBA1dA0YU&enc=AQAEAAACUBPxNw%2BVj6nta7CKEs3N0qXVP4Trzp60gMmz2Fiq3oo%2BtHdeZCyZza%2B2o4XnjeBi7NpQPda6mDuMQGluOxUMzIpYrkl4Aypkxy%2B5wHyf8A4Rpths0ih2bwnLPDs3rWfUsdHkNPE3gmHTsXvbSeO%2B3qX2ZVH3q%2FbeWkcmXeWy7KcX76WFQnS4Tff24HLSKjGxVKVrTk13JTyUPaZDWH5MIIu6nHbzpW6Uffua9vivaMflyZrkeZX7YeY2R83uUT%2B4fAtAeROsJQjlgZM%2BJHfdECc9z4add%2FOYvJWfow5eyllt4xw5uBuMObNqagXnZAi7E8VOoxtA5guBB%2BRIFXVhtHR73ByppQG8SsQVNnRmbYzLfj2RF2mHFRkzHD0xNB%2BWT35c8nqDCFL25XS649erxjES5U6EmQUxPUJVbMAU%2FLcRYP7NGJ9H9Oxt%2FZOQ7PwQ9tXP0uieLKpiqdM2KOESgitFnmYJ5cdrzuAc33yI3Gg%2F%2FzBeUoT3zNXwsQ5jkuQrpVSAJkvrXsGRNcwIllBD1Vbi%2FZ8J3KRp3N4hluSwRRDsN%2FcU%2F%2B%2BaUqFSqkZMFVAmSnITBgVNwhT0wff6OYOTiG8OnU9h%2FLPIvRMduCK%2FUIukd5p17xxscZG8fnupNYzqlDq%2FwVhv7jxHEa5VRaY4J1eaLTSMpt3Sxm4Ys5vHZmyLzrkAz9MVhxx6x3pxZ8%2FIAUStRAGR9ncvwimmrycFPppX8w56X%2BP7ECspiMB7NvvAJ1G1siaMODmJ1v8Jf0Hr9yOalx0OglmgkdD9ACtxL44%3D&checksum=264361749206d732d8c214bf43c795a2f5abb778e9ff
There are all sorts of strip lights as well.
For night lights for offshore sailing, I reckon trailer side lights would be perfect.
www.ebay.com.au/itm/LED-CLEARANCE-LIGHTS-SIDE-MARKER-LAMP-RED-TRAILER-TRUCK-CARAVAN-MULTI-VOLT-LIGHT/232013304674?hash=item3605121362:g:BN8AAOSw~nJebwkC:sc:AU_RegularParcelWithTrackingAndSignature!2540!AU!-1
All ready to drop the ram in in when I realised I forgot the plastic container with the main keel pin in it.
%^$&^@@!()&^!!!!

There's a bit more room without the pump and reservoir in the way, so I'm glad I took it out.
I'm just glad I don't have to take the lid of the keel box, ![]() .
.
A quick scrub in the morning, lift the ram into position, tap the keel pin in, drop the ram cylinder pivot plates on and the ram is in.
The two lower bolts in the pic is where the hydraulic pump bolts on with the reservoir beneath it resting on the floor. Connect the hydraulic lines and electricals. Then it's a matter of reseal the keel pin sight glasses back onto the keel box, and refit two rubber boots over the keel box hole and ram cylinder and we're done.
I'll wait for the trip home and then start the clean up, the poor thing's a mess.
We got the ram re-installed today but not 100% complete yet.
The actual install went pretty smoothly.
First step was to pin the ram shaft onto the keel. The side of the cabin table has a panel cutout , this is from the side of the table looking through the 50mm hole where the little sight glass goes on, we had to remove the sight glasses to drop the pin out. That's the keel head you can see just behind the fibreglass, with the ram shaft in the centre, you have to slide the shaft into the keel socket. Align the ram head with a couple of tapered nudge bars, drift punch the pin in, caps on and it was done.

Part two was getting the ram onto its pivot mounts. The pivot stubs are like steel pipes capped and welded onto plates, about 50mm proud off the plate and about 100mm OD. These plates bolt on the side of the keelbox, pinning the cylinder into place. One guy jumps inside the table straddling the ram with a rag wrapped around it and lifts whilst the other guy guides him into the right up/down/backwards/forwards till the sockets welded on the side of the cylinder are aligned for the end plates to go on. Once aligned, you slide the end plates onto the 4 bukka rods bolted through the keelbox. If your alignment is good, the plates will go all the way on till the pipe nubs on the plates slide into the sockets on the ram cylinder. This part was rubber hammer time and tapping verrry slowly, but soon the plates were home and everything bolted up.

Part three was dropping in the pump and reservoir, then fit off the electrical and hydraulic lines.
She is starting to look like a real boat again!

Now all we had to do was start the engine, motor the keel up and down a few times to get the ram full of oil, top up the oil to the right level and the job is finished.
And because it's a boat and they have an annoying bloody habit of throwing curve balls at you, we went to start the engine smiling happily at a job well done and....click click click. Nothing.
Sigh.
Turns out the engine battery had picked up enough corrosion on the terminals to stop it charging. And worse, the battery terminal clamps were those stupid square head ones that you cant get a spanner onto. As soon as I went to undo the nuts, the square head just rotated in its little cutout so I couldn't undo the nuts, the whole bolt and nut just turned. A reminder, boats do NOT like sitting still. My fault, I had got so consumed with this project I had neglected the regular maintenance of late. Not good, so I deserved this kick up the backside.
Big sigh.
To cut a long story short, the diesel tank is now out. I had to pull it out to get enough room to undo the errant battery clamps, but now the battery is at home beside me merrily charging away, whilst I roll around the floor in pain after washing my hands with that bloody hand sanitiser finding the bazillion myriad cuts on my hands......... I swear some of that sanitiser is like 90 proof alcohol.
Have another go tomorrow at finishing it off, Just keep ticking off the checklist one tick at a time........

Select to expand quoteLooseChange said..
Oh come on Shaggy man up 90 proof is only 45 ABV, that's drinkable strength.
I never get that right.
It's like metric tons and ...the other tons.
Or Celcius to Fahrenheit.
Or American time zones. Never can work them out, it's like drop a day, then add 63 hours minus the East Coast delta of -3 hours...meh.
Edit: almost forgot..and feet to metres.
Well it wasn't just today - it was over the course of the last 10 days or so. Little jobs that I hadn't gotten around to, but now with so much time to spare on the boat I'm getting them all done. Very happy with the results:
It's been said earlier in this post "no pictures-no proof" so here goes - I've used a few of them and kept the descriptions short.
New washboards
In progress, insides. (3months ago!)
 Finished product from outside-
Also made up a clear 3mm polycarbonate version that folds down flat, for use at night or when it's raining. I can fold up the bottom section to allow extra ventilation. It catches the water and sends it to the sides to drain.-

Mounted the epirb-

New bridle and painter for the dinghy, spliced and whipped -

Spliced an eye into a new kedge/stern anchor line -

New concealed led lighting strips in the saloon- running on battery packs atm till I'm happy with the position, then I'll wire them in permanently-

Wired up and fitted a new auxiliary panel. Has 12v socket, USB ports, and shows SOC of the house batteries -
Then came the big bastard of a job removing 30 year-old decals from the cabin sides - cleaning, prepping, masking and painting a new blackout. This one took me 3 days- once I started I discovered there were two layers of decals!


This was about 30% of the mess-

First coat done- need to modify the shape a bit til im happy, then final coats. A friend made me a new logo decal in chrome vinyl, it will go between ports where the old yellow one used to be-

Also (but no pics) spent pretty much the whole day yesterday cleaning and polishing every bit of chrome and stainless steel I could find! Looks great now.
Hmmm, some of the pics turned sideways when I uploaded - don't know why, they were all correctly orientated on my phone. I don't know how to fix them. Sorry folks!![]()
Top job right there Azure, assume you got back to land before the sw gale came in............that polycarb work is excellent, and have never seen that before as regards someone trialing interior lights with battery pack to ensure the correct location - for sure an interior decorator class fit out right there, mood lighting, other................
Thanks r13!![]()
Nope, at anchor when it hit -still here now! (Store Beach)
It came on a bit this afternoon but it's starting to back off now. Been on the boat for 2 weeks now, that's why I've gotten so much work done - won't hit land again till Monday to get meds and restock supplies, and then back out for maybe another 2 weeks - we'll see what happens![]()
Select to expand quoteAzureF305 said..
Then came the big bastard of a job removing 30 year-old decals from the cabin sides - cleaning, prepping, masking and painting a new blackout. This one took me 3 days- once I started I discovered there were two layers of decals!
First coat done- need to modify the shape a bit til im happy, then final coats.
I like the look of that!! ![]()
Thanks Lazzz ![]() . Best part is it will hold up to the weather better than decals & if it does get damaged -just touch it up again with gloss black! Me a happy chappy
. Best part is it will hold up to the weather better than decals & if it does get damaged -just touch it up again with gloss black! Me a happy chappy![]()
That looks awesome Azure. The black looks like it should be factory, suits the lines.
My favourite is the washboard though, the woods looks fantastic but that clear I really like. How did you get the rain to run off to the sides if you open the bottom part?
Finished off the keel today, it took about two months longer than I wanted but the consolation prize is I got to clean and scrub everything which always makes me happier.
The best tool on the whole project turned out to be a $50 wet and dry vacuum. I spent a couple of days under the cockpit scrubbing as when the muffler had a leak it left ugly brown stains on the fibreglass and through normal wear and tear it had got pretty grungy. As I had the diesel tank and engine battery out, it was a great opportunity to get in there and clean clean clean, so with images of a sparkling clean undercockpit I got stuck into it. The reality turned out a bit different, hours with rags/wipes and a scrubbing brush just wasn't cutting it, I seemed to just push crap around rather than get it out.
Everytime this happens, I'm reminded of the old adage about having the right tool for the job, so I downed tools, jumped in the car and went home to get the little shed wet/dry vac.
Got back down the boat, boiled a few kettles of water , added some sugar soap and filled up the compartment with hot soapy water, attacked it with scrubbing brush, then stuck the vacuum in there and within a few minutes had sucked all the water out with grunge. Presto! It looked so much better, even though I couldn't get rid of the brown exhaust stain, the rest came up really well. The vacuum is the smallest one Bunnings have but still hold 20litres of water, so you can do a fair biit before popping out to empty it. It turned hours of fruitless work into something pleasurable...and much easier on the back, best $50 spend of the whole project! 
After that it was re-install the battery and tank, connect everything back up, and then I could start the engine and move the keel. It took about 15 mins of keel up/downs to work the air out of the cylinder, initially with movement of a few feet then working up to full movement. Top up the oil, then the table top could finally go back on.
I spent the next hour cleaning, as the boat looked more like a toolshed than a yacht, but I should be able to push off tomorrow and get her home. More cleaning to do back at the berth but I'm a happy man.

Select to expand quoteshaggybaxter said..
That looks awesome Azure. The black looks like it should be factory, suits the lines.
My favourite is the washboard though, the woods looks fantastic but that clear I really like. How did you get the rain to run off to the sides if you open the bottom part?
Thanks Shaggy, really appreciate that.![]()
The clear washboard is joined with fibre reinforced tape with a gap between them to allow a flexible hinge- 6mm I think. I just fold up the bottom section against the third section, put it back in the slot - it sits snuggly in with the top three quarters and the gap at the bottom, and because of the hinge the bottom panel wants to flex outwoods creating a gutter. Rain runs down the panel, gets caught, and then runs out to the sides to the normal washboard channels. You can't use it like that in all conditions of course, but if it rains heavier, the fully extended panel is just as effective as the normal boards. Sorry this was a bit long-winded but hey - I've been on the boat 17 days I'm bored, haha![]()


Tonight I installed a 'fluro' light in the companionway steps - see the pic![]()
![]()
![]()
wait for it........

I told you I was bored!!![]()


